
Blog · Self-hosting
Install MongoDB in Docker as a replica set
A replica set in Docker is a piece of cake too. Don't let the forum threads scare you: with the right setup it takes three minutes, one command, and the container behaves like a normal server. You get a replica set from day one, so your app can use transactions and a second server is one line away.
The newest MongoDB (9.0 today) in a container, as a replica set, with a password and a keyfile, listening only where it should:
curl -fsSL https://bsonjet.com/blog/install-mongodb-ubuntu-replica-set/install-mongodb.sh \
  | sudo DOCKER=1 bash
About 3 minutes on any Linux with Docker, Ubuntu 26.04 included. At the end it prints your connection string: user admin and a generated password, also saved for root in /root/mongodb-credentials.txt (sudo cat it any time).
With options, all of them optional:
curl -fsSL https://bsonjet.com/blog/install-mongodb-ubuntu-replica-set/install-mongodb.sh \
  | sudo \
  DOCKER=1 \
  MONGO_HOST=db.example.com \
  ADMIN_USER=admin \
  ADMIN_PASSWORD='YourStrongPassword' \
  MONGO_VERSION=8.0 \
  RS_NAME=rs0 \
bash- MONGO_HOST: the DNS name other machines connect to (your app server, your laptop, a second MongoDB later). Default: the server's name.
- ADMIN_USER, ADMIN_PASSWORD: your own login. Default:
adminand a generated password. - MONGO_VERSION: a specific version, e.g. 8.0. Default: the newest. RS_NAME: the replica set name, default rs0.
The script writes a compose file to /opt/mongodb and starts the container mongodb from the official image. It's the same script as without Docker, read it first.
Why a replica set on one server?
- Room to grow, for free. A second or third server later is one command: no reinstall, no downtime, no license. If one server dies, another takes over.
- A move without downtime. Add the new server, let it sync, switch, remove the old one. See below.
- Transactions. Without a replica set, the first transaction fails with
Transaction numbers are only allowed on a replica set member or mongos. Mongoose, Prisma and everywithTransaction()need one.
The price: the oplog, by default 5% of the free disk (at most 50 GB). That's it.
The traps the script avoids
-
The container stops right after it starts
On a host with a newer kernel, the official image refuses to start:
Linux kernel versions 6.19 and newer has a known incompatibility. The official advice, a newer kernel, doesn't help on Ubuntu. We tried.one variable set by the image causes it, and our compose file clears it:
environment: GLIBC_TUNABLES: "" -
The app can't find the server
The replica set tells every client its own name for the server. In Docker that's usually the container name, so everything outside the compose network gets
getaddrinfo ENOTFOUND mongo. A classic.the container runs on the server's own network (
network_mode: host) under the server's name, like without Docker. Other machines will connect? Give it its DNS name from day one withMONGO_HOST. -
ufw says closed, the internet says open
A published Docker port (
27017:27017) goes around ufw. Remember MongoBleed: about 75,000 exposed servers.no published port at all. mongod listens only on
127.0.0.1and the address ofMONGO_HOST, never on a public one by accident, and your firewall applies as usual. -
Keyfile: permission denied
A replica set with a password needs a keyfile. In the container it must belong to the mongodb user (999) and nobody else may read it.
the script makes it like that:
/opt/mongodb/keyfile, owner 999,chmod 400. -
docker compose pullbroke the databaseWith
mongo:latest, one day the pull skips a version. mongod then refuses your data withUPGRADE PROBLEM: Found an invalid featureCompatibilityVersion documentand the container restarts in a loop until you go back to the old tag. We tried: 7.0 straight to 9.0.the tag is your version (
mongo:9.0) and only the update script changes it, one step at a time.
Updates: patches and the next version
# the newest patch of your version (security fixes)
curl -fsSL https://bsonjet.com/blog/install-mongodb-ubuntu-replica-set/update-mongodb.sh \
  | sudo bash

# the next version
curl -fsSL https://bsonjet.com/blog/install-mongodb-ubuntu-replica-set/update-mongodb.sh \
  | sudo bash -s -- --to 9.0
The script finds the container by itself. A patch pulls the newest image of your version and recreates the container; if there is none, it says so and changes nothing. Versions can't be skipped, so --to takes one step at a time:
It changes the version in /opt/mongodb/.env, pulls the image and sets the feature compatibility version on both sides of the step (the part everyone forgets until the next upgrade fails). Not sure which version you run? BsonJet shows it for every server, next to the newest MongoDB out there.
On more servers, run the patch update on the secondaries and the arbiter first, the primary last. --to is for a single server; a set follows MongoDB's rolling upgrade.
Adding more servers
Always an odd number. A replica set needs a majority of votes to pick its primary: with two servers, when one stops, the other has 1 vote of 2 and turns read-only. Two servers are less available than one.
The cheapest odd number is two data servers and an arbiter. The arbiter only votes, keeps no data and runs on the smallest VPS, or next to your app.
- On db1, print the keyfile and the connection string:
sudo cat /opt/mongodb/keyfile /root/mongodb-credentials.txt - On db2, install it with both of them:
curl -fsSL https://bsonjet.com/blog/install-mongodb-ubuntu-replica-set/install-mongodb.sh \ | sudo \ DOCKER=1 \ MONGO_HOST=db2.example.com \ JOIN='paste MONGO_URI from db1' \ KEYFILE='paste the keyfile from db1' \ bash - On the arbiter, the same plus
ARBITER=1:curl -fsSL https://bsonjet.com/blog/install-mongodb-ubuntu-replica-set/install-mongodb.sh \ | sudo \ DOCKER=1 \ MONGO_HOST=arbiter.example.com \ JOIN='paste MONGO_URI from db1' \ KEYFILE='paste the keyfile from db1' \ ARBITER=1 \ bash - In your app, list both data servers:
db1.example.com,db2.example.com.
Each new server copies the data first and gets its vote only then, so the set never loses its majority. Open port 27017 between your servers (and for your app servers), nowhere else.
Moving to a new server without downtime
Add the new server as above. When it's a secondary, let it take over and remove the old one, in mongosh on the primary (sudo docker exec -it mongodb mongosh 'paste MONGO_URI'):
cfg = rs.conf()
cfg.members.find(m => m.host === "db2.example.com:27017").priority = 2
rs.reconfig(cfg)
// a few seconds later db2 is the primary; remove the old one
rs.remove("db1.example.com:27017")
In our test an app kept writing every 100 ms through the whole move: 0 failed writes. One catch: the running app found the new server by itself, but its connection string still names the old one. Update it before the next restart.
Then see what it's doing
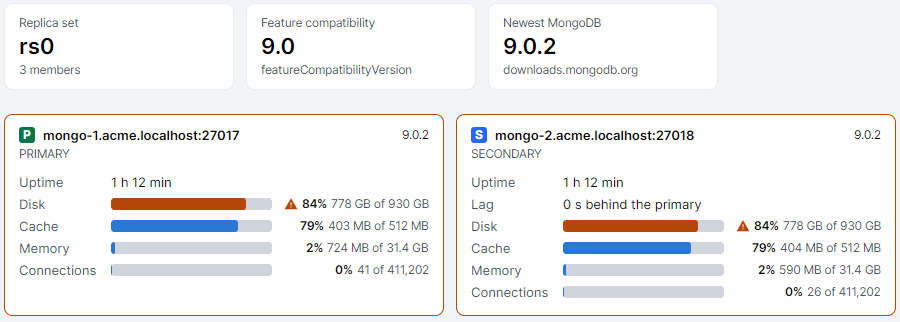
Once it runs, BsonJet shows the whole replica set at a glance: every member's role, lag, disk and cache, the feature compatibility version and whether a newer MongoDB is out. Handy while the new server syncs.
Connect to your new server.
The full version is free for personal use, no registration.